KU ONLINE PROGRAMS HELP CENTER
1. Create a KU edX Account
How Do I Join? To begin, please register for a KU edX account. You will need to:
- Enter your first name and last name (Your full name will appear on any certificates that you earn.)
- Enter your email address The e-mail address must be the same as the one you applied for the program
- Create a public username (cannot have spaces) Note: You cannot change your username once it has been created.
- Create a password
- Select Create your account
Koç University members can create an account using their KU NetID.
You can enroll in the course by selecting the Enroll button on the course About page. Note: You may be automatically enrolled in some courses. You do not need to re-enroll in the course.
After registering, you will receive an activation email at the email address you entered during registration. Select the link in the email to activate your account.
if you do not see the activation email in your email inbox please contact us.
When Does My Course Start and End?
KU edX courses are not 'live', so there is no set time when you will need to be viewing the course. If you search for a course in the course catalog then click the course thumbnail, you will view the course introduction page.
The start and end date will show on the session selection button:
3. Checking Your Course Progresss
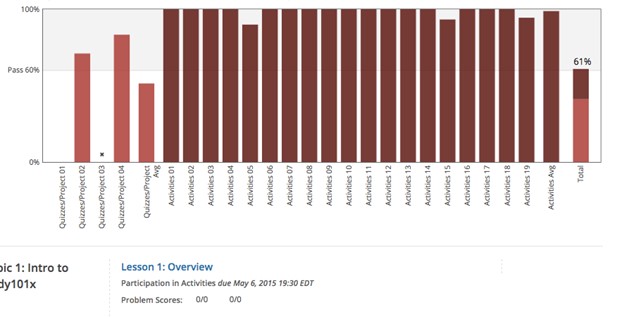
You can see your current grade in a course by clicking the Progress tab in the course.
As you work through the graded assignments in a course, your scores will appear on the Progress tab of your course. The Progress tab contains a chart of all graded assignments in the course and below that, a list of all assignments and their scores.
To pass and earn a certificate in the verified track you will need a total score meeting or exceeding the 'Pass' line between the gray and white sections on the graph by the course end date.
Note: Only graded assignments appear in the graph and count towards your final score. The 'average' columns show your cumulative average for all assignments of that type through your course. This will rise as you complete more assignments of that type.
4. View Your Grade Details
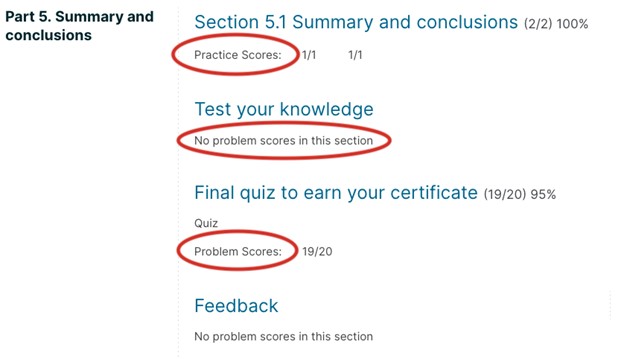
You can view your scores on individual problems, as well as your current overall course grade, by selecting the Progress page and scrolling down to the outline below the Progress chart.Below the grading chart is a list of course sections in the order that they occur in the course. Each section will contain one of the following grading details:
-
Problem Scores:
The points that you earned out of the possible points for graded assignments. These count towards your final score for the certificate. In addition, this graded subsection may not be available to audit track learners. - Practice Scores: The points that you earned for ungraded assignments. These assignments do not count towards earning the certificate, and they may award zero points.
- No problem scores in this section: Sections that do not have any assignments, graded or ungraded.
When you are working in a course, green check marks show your progress through the lessons. These check marks appear when you complete all of the content in a part of the course.
The green progress check marks are a visual aid and do not have any bearing on your course completion status or certificate eligibility. (You can see your grading and progress towards passing your course on the progress tab.)
To receive a green checkmark, you must complete all of the following actions.
- View all of each video in the unit.
- Submit answers for all of the problems in the unit.
- View all HTML content in the unit for at least five seconds.
(For some advanced assignment types added by course staff, a check mark may not appear. This does not impact your course grading.)
5. Where Can I Find My Program Certificate? (If Aplicable)
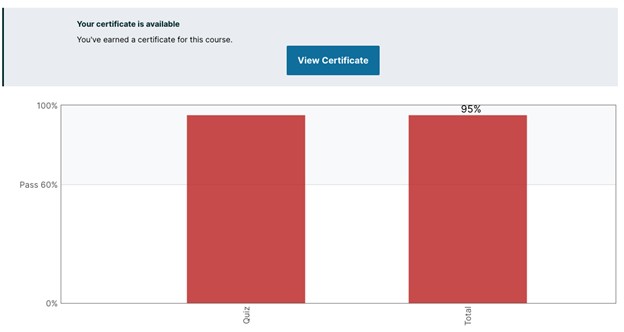
If you have reached a passing score on your Progress page in the course, you can earn the certificate. When your certificate is ready, a link appears on the Progress Page. A link to view the certificate appears at the top. You can save the certificate by downloading it as a PDF file.
6. Timed Exams
How Do I Take a Timed Exam?
Timed exams are sets of problems that you must complete in a limited amount of time. Timed exams are indicated on the Course page by a clock icon and the label Timed Exam.When you start taking a timed exam, a timer on the course page counts down the amount of time that you have remaining to complete the exam. You can not pause or reset the timer. When there is no time remaining, the course page automatically ends your exam.The time limit for an exam applies to all of the units in an exam section. If an exam includes problems on multiple unit pages, you must complete the problems on each unit page before you submit the exam or before the time runs out.
Taking a Timed Exam
- Open the timed exam page in the course.
- Select I am ready to start this timed exam (You will not be able to pause or restart the exam after you begin).
- Complete the problems in each unit of the exam. Select Submit to score the problems in the unit. If you do not select Submit, your responses will not be scored.
- Monitor the amount of time remaining in the time display at the top of the course page. When 20% of the time remains, the time display bar darkens to alert you. When 5% of the time remains, the text on the time display bar becomes bold. You can hide the amount of time that remains in your exam by selecting the icon that is located next to the timer. To show the remaining time, select the icon again.
- After you have completed and checked all the units in the exam, select End My Exam at the top of the course page. If you run out of time, the exam will end automatically.
Note: You must select Submit to score the problems in each unit of an exam. If you submit an exam without selecting Submit in a unit, your exam results will not include scores for any of the problems in that unit.
Hiding the Exam Timer
By default, in timed exams you see a timer that shows the amount of time remaining. You can hide or show the timer.
- To hide the timer, select the eye icon that is located next to the timer.
- To show the timer, select the eye icon again.
Requesting Additional Time
To accommodate specific needs, course teams and instructors can increase the time allowed to complete an exam. Contact your course team to get information on whether extra time may be available for your exam.